VMWare “Another task is already in progress” error

Straight from : http://community.spiceworks.com/how_to/show/662

I’m using ESXi 4.0, and i was facing the problem of “Another task is already in progress” error, practically the VM could not be used at all (turn on restart or even force off).

in ESXi 4.0 SSH console, using the command “service mgmt-vmware restart” will do no good :-(

therefore the solution is by using: services.sh restart command, quite simple and it doesn’t kill the whole VM process which is currently running on production, the only thing that is affected is the VCB backup, it failed when that command issued. Finally in your vCenter console, right click on your ESXi host in which you run the command and then click on reconnect.

So on the ESXi box hosting the troubled VM run;

services.sh restart

Then reconnect to that ESX box via VI Client. Shouldnt effect any of the other already running virtual machines.

Jumbo Frames on your vSphere ESXi box

Continuing on from this https://sigtar.com/2010/02/04/vsphere-and-multipathing-iscsi/

you may want to implement jumbo frames to your iSCSI backend…

Enable jumbo frames on your iSCSI target and switches then complete the following on the ESXi hosts (iSCSI initiators)…

This to list your current switch details and port group names…

esxcfg-vswitch -l

The following to allow jumbo frames onto your vswtich (insert your vSwich in following)

esxcfg-vswtich -m 9000 vSwitch0

Then create your kernel port groups that you want to use for iscsi, my commands looked like this… (repeat for each iscsi kernel port you have) — note : DO NOT ADD ANY VMKERNEL(s) from the GUI, instead use the steps below

esxcfg-vswitch -A iSCSI vSwitch0

If you are using a tagged vlan you will also need to add the vlan tag to the above port group

esxcfg-vswitch -v 192 -p iSCSI vSwitch0

esxcfg-vmknic -a iSCSI -i 10.0.0.101 -n 255.255.0.0 -m 9000

To confirm you have set the MTU (frame size) correctely, run the following….

esxcfg-vmknic -l

you should see your iSCSI kernel ports with a MTU of 9000 all going well. Confirm connectivity using

vmkping –s 9000 10.0.0.10

vSphere and Multipathing iSCSI

This is just a quick reference to create a multiplathing iSCSI setup…

Create two virtual kernel switches, one called “iSCSI-1” and the other called “iSCSI-2” (and so on if you have more nics)

Then per kernel portgroup ensure that only one of the nics is active. For the “iSCSI-1” portgroup configure it to override the virtual switch settings and move nic 0 to active and nic 1 to unused. For the “iSCSI-2” portgroup configure it to override the virtual switch settings and move nic 1 to active and nic 0 to unused.

Now you have to run some esxcli commands to gel things together…. alt-f1 on the esxi console and type “unsupported” followed by your root password. The following is the command i have to run to get both my portgroups to work together on the iscsi hba….  (you can check your vmk number from the networking config screen)

esxcli swiscsi nic add -n vmk1 -d vmhba33
esxcli swiscsi nic add -n vmk2 -d vmhba33

For each target then change the path selection method to “round-robin”.

Go back to storage adapters and click “rescan”

If you want all future iSCSI targets to automatically use round-robin you must also run the following from commandline…   (this is for our HP Lefthand, your “storage array type” may be different. Its listed under your target details). Basically sets round robin as a default for this type of array. In general you should do this first before presenting any LUNs etc, else you may have to bounce your box.

esxcli nmp satp setdefaultpsp –satp VMW_SATP_DEFAULT_AA –psp VMW_PSP_RR

Update : Hardware iSCSI nics

The process for hardware iSCSI initiators is similar to above, but you assign a single kernel port per nic. To find which nic belongs to which iSCSI initiator you must run this command from the CLI;

esxcli swiscsi vmnic list -d vmhba#

vmhba# is the name of the iSCSI adapter.
HDD short stroking – is it worth it?

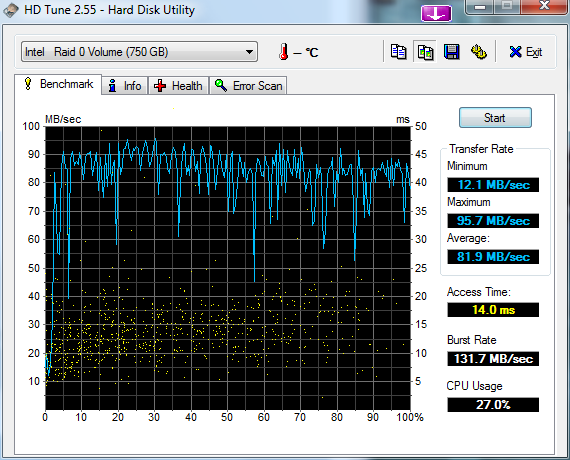
I’ve got some old 250Gb drives that are starting to show their age. I’ve currently got them setup in a 3x RAID 0 config which presents about 750Gb of space.

I’ve got everything on a single partition (meh, i’m lazy). I’ve done various speed tests in the current setup (with all space allocated), but i thought i’d re-image onto a short stroke partition.

I only use about 150Gb of space on my main machine (most of my data is on another box), so i’m going to try creating a 200Gb partition to test if this provides any kind of performance boost.

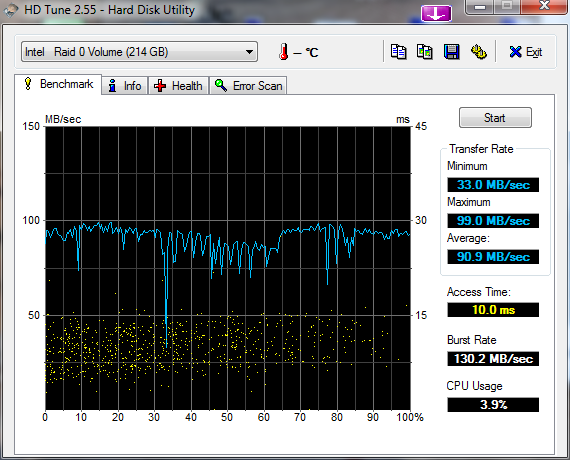
So reducing my raid 0 from 750Gb to 214Gb, and here are the results…

Before with all 750Gb presented…

Same disks but short stroked to 214Gb….

Conclusion : Yip, seems like its worth it if you have the spare space. Average throughput is up by 10MB/s and seek has improved by almost a third loosing 4ms.

You will get even more of an improvement if you can use a smaller % of capacity per drive and / or more drives for your stripe.

Updated : 07/02/2010

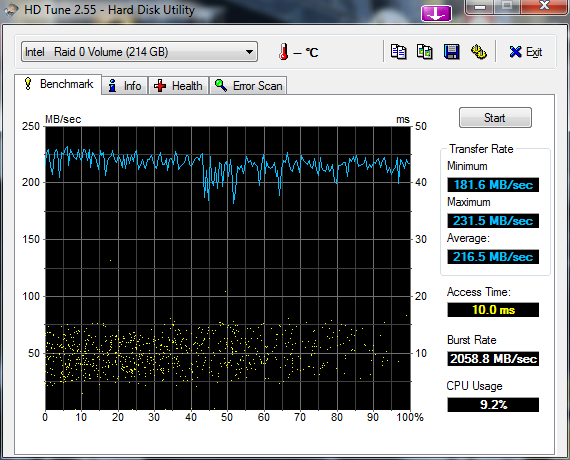
btw – the above was without write-back cache enabled…. if i turned that on i got the following…