Ubuntu – Disable Firewall

if your working with Ubuntu in lab or test env, you may want to disable firewall…. two simple commands;

sudo ufw disable 

sudo apt-get remove ufw 

Reading package lists... Done
Building dependency tree
Reading state information... Done
The following packages will be REMOVED:
ufw
0 upgraded, 0 newly installed, 1 to remove and 3 not upgraded.
After this operation, 838 kB disk space will be freed.
Do you want to continue? [Y/n] Y
(Reading database ... 64052 files and directories currently installed.)
Removing ufw (0.35-0ubuntu2) ...
Skip stopping firewall: ufw (not enabled)
Processing triggers for man-db (2.7.5-1) ...

nginx – setup as reverse proxy

Previously to take down this wordpress site all you needed to do was hold down F5 for about 20 seconds then the site would take about 5 mins to recover.

There were a few factors causing this and quite a few different methods to solving the problem. WordPress itself is run on php / apache, apache has an evasive mod which can block certain IPs depending on the defined abusive behavior (typical DDOS attack). Since i like to run a few websites behind a single IP i looked at fixing the issue closer to the perimeter….

Enter nginx (engine x) as a reverse proxy, the site now typically caches all content and serves it straight out of memory. No longer does mysql / apache kill itself under high load on the backend…

nginx

You will need to create the nginx directories if they dont already exist. Check /var/log/nginx/error.log (default ubuntu) if any issues starting the service.

sudo aptitude install nginx
sudo service nginx start

The following added to http {}
(located in /etc/nginx/nginx.conf)

log_format cache '***$time_local '
'$remote_addr '
'$upstream_cache_status '
'Cache-Control: $upstream_http_cache_control '
'Expires: $upstream_http_expires '
'"$request" ($status) ';
access_log /var/log/nginx/access.log cache;
error_log /var/log/nginx/error.log;
server_names_hash_bucket_size 64;
proxy_cache_path /var/www/nginx_cache levels=1:2
keys_zone=one:10m
max_size=1g inactive=30m;
proxy_temp_path /var/www/nginx_temp;

the following added to location / {}
(located in /etc/nginx/sites-enabled/default)

proxy_pass http://sigtar;
proxy_next_upstream error timeout invalid_header http_500 http_502 http_503 http_504;
proxy_redirect off;
proxy_buffering on;
proxy_buffer_size 16k;
proxy_buffers 32 16k;
proxy_cache one;
proxy_cache_valid 200 302 304 10m;
proxy_cache_valid 301 1h;
proxy_cache_valid any 1m;
client_body_buffer_size 128k;
proxy_busy_buffers_size 64k;
proxy_set_header Host $host;
proxy_set_header X-Real-IP $remote_addr;
proxy_set_header X-Forwarded-For $proxy_add_x_forwarded_for;
proxy_pass_header Set-Cookie;

Note if you have problems with wordpress redirect issues… check this post;

http://tommcfarlin.com/resolving-the-wordpress-multisite-redirect-loop/

Also confirm you have this line in http {}

server_names_hash_bucket_size 64;

Very basic load test, user load time is reasonably consistent as user count increases.
http://loadimpact.com/load-test/sigtar.com-ad07b7870a75c854a935752b0a032c53
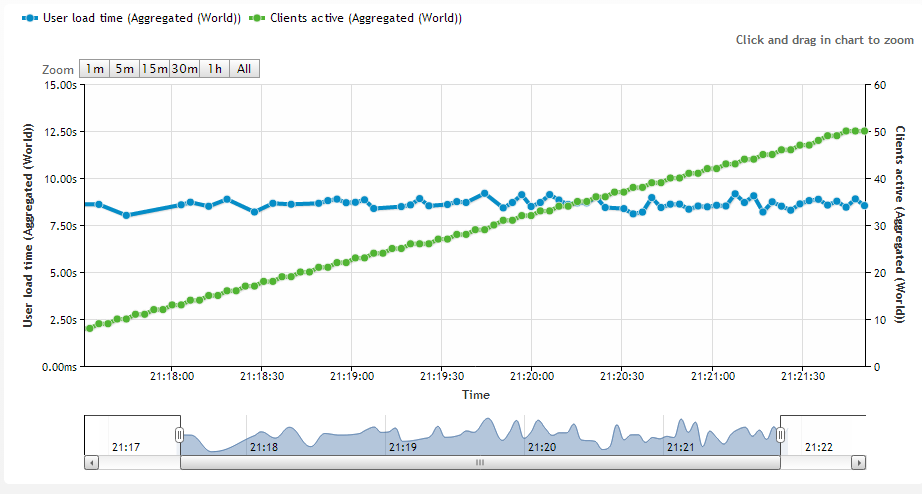
load test

squid – reverse proxy

Great guide here – http://www.classhelper.org/articles/reverse-proxy-server-squid-debian/installing-squid-proxy-server.shtml

I’ve modified slightly for Ubuntu, but almost identical.

apt-get install squid
cp /etc/squid3/squid.conf /etc/squid3/squid.bak
rm /etc/squid3/squid.conf
nano /etc/squid/squid.conf

http_port 80 defaultsite=www.yoursite.com vhost
forwarded_for on
refresh_pattern ^ftp: 1440 20% 10080
refresh_pattern ^gopher: 1440 0% 1440
refresh_pattern . 0 20% 4320
cache_peer 192.168.0.13 parent 80 0 no-query no-digest originserver name=web1
acl sites_web1 dstdomain www.yoursite.com yoursite.com
cache_peer_access web1 allow sites_web1
cache_peer 192.168.0.14 parent 80 0 no-query no-digest originserver name=web2
acl sites_web2 dstdomain www.anothersite.com anothersite.com
cache_peer_access web2 allow sites_web2
acl all src 0.0.0.0/0.0.0.0
acl manager proto cache_object
acl localhost src 127.0.0.1/255.255.255.255
acl to_localhost dst 127.0.0.0/8
acl SSL_ports port 443
acl Safe_ports port 80 # http
acl Safe_ports port 443 # https
acl Safe_ports port 1025-65535 # unregistered ports
acl CONNECT method CONNECT
http_access allow sites_web1
http_access allow sites_web2
http_access allow manager all
http_access allow manager
http_access deny !Safe_ports
http_access deny CONNECT !SSL_ports
#http_access deny all
access_log /var/log/squid3/access.log
cache_mgr [email protected]


Modify your hosts file to include web1 and web2

nano /etc/hosts

192.168.0.13 web1
192.168.0.14 web2

Another good article about benefits of reverse proxy

http://2bits.com/articles/increasing-drupals-speed-squid-caching-reverse-proxy.html

Linux – install vmware tools onto guest

fire up the vm, then run the following after initiating a vmware tools install…

mount /dev/cdrom /mnt/cdrom
cd /tmp
tar zxf /mnt/cdrom/VMwareTools-x.x.x.gz
cd vmware-tools-disstrib
./vmware-install.pl

Then just follow the prompts through to the end.

If your running fedora or similar make sure your’ve got gcc and kernel headers…. (you’ll probably have to update kernel too)

yum update
shutdown -r now
yum install -y gcc make kernel-devel perl

Ubuntu 12.x

apt-get install open-vm-tools

some notes from fedora 13…

Did you also copy the missing/misplaced include file?

(Having just updated the kernel I am getting the original messages, so have copied them below as I workaround the problem)

= = = First I get:

What is the location of the directory of C header files that match your running
kernel? [/usr/src/linux/include] /usr/src/kernels/2.6.33.5-112.fc13.x86_64/include

The directory of kernel headers (version @@VMWARE@@ UTS_RELEASE) does not match
your running kernel (version 2.6.33.5-112.fc13.x86_64). Even if the module
were to compile successfully, it would not load into the running kernel.

= = = Then over in another session at
/usr/src/kernels/2.6.33.5-112.fc13.x86_64/include

[Tom@tlsf13a include]$ find . -iname ‘*relea*’
./config/kernel.release
./generated/utsrelease.h
[Tom@tlsf13a include]$ sudo cp -p generated/utsrelease.h linux/

= = = Then back in first session:

What is the location of the directory of C header files that match your running
kernel? [/usr/src/linux/include] /usr/src/kernels/2.6.33.5-112.fc13.x86_64/include

Extracting the sources of the vmmemctl module.

= = = and the vmware-config-tools.pl runs ….
(well, all but vmci builds … :-/ )