zfs compression and latency

Since im using ZFS as storage via NFS for my some of my vmware environments i need to ensure that latency on my disk is reduced where ever possible.

There is alot of talk about ZFS compression being “faster” than a non-compressed pool due to less physical data being pulled off the drives. This of course depends on the system powering ZFS, but i wanted to run some tests specifically on latency. Throughput is fine in some situations, but latency is a killer when it comes to lots of small reads and writes (in the case of hosting virtual machines)

I recently completed some basic tests focusing on the differences in latency when ZFS compression (lzjb) is enabled or disabled. IOMeter was my tool of choice and i hit my ZFS box via a mapped drive.

I’m not concerned with the actual figures, but the difference between the figures

I have run the test multiple times (to eliminate caching as a factor) and can validate that compression (on my system anyhow) increases latency

Basic Results from a “All in one” test suite… (similar results across all my tests)

ZFS uncompressed:

IOps : 2376.68
Read MBps : 15.14
Write MBps : 15.36
Average Response Time : 0.42
Average Read Response Time : 0.42
Average Write Response Time : 0.43
Average Transaction Time : 0.42

ZFS compressed: (lzjb)

IOps : 1901.82
Read MBps : 12.09
Write MBps : 12.28
Average Response Time : 0.53
Average Read Response Time : 0.44
Average Write Response Time : 0.61
Average Transaction Time : 0.53

As you can see from the results, the AWRT especially is much higher due to compression. I wouldn’t recommend using zfs compression where latency is a large factor (virtual machines)

Note: Under all the tests performed the CPU (dual core) on the zfs box was never 100% – eliminating that as a bottleneck.
OpenSolaris – Samba server

Time to share your newly created ZFS volume via samba to your windows clients.  There is some CIFS / SMB support built into the kernel now, but i’ve grown used to the SMB server…

Fire up add software – click filesystems – enable filter for “smb”, there are three packages generally. I get all three, but you only need the kernel update and the server package. The other is the SMB client.

Once installed make sure you enable the server in servicesgui.

Ensure the filesystem does not have any permission issues. I usually run chmod -R 777 /share just to ensure everyone can access the files without issue.

Add some users into smb password file (U need to create the users and sync the passwords). I usually create a guest user profile

useradd guest

smbpasswd -a guest – it should prompt for password twice (this is the password you use from windows). Press enter twice to leave the password blank.

The configuration can be done via /etc/sfw/smb.conf or via the shared folders admin gui.

I prefer doing the admin via the /etc/sfw/smb.conffile as it tends to let you have more control than the basic options available to you via the GUI. The contents of the file are as follows;  (note: i have included alot of the setting as an example which may contridict other settings)

[global] – global settings, the following are obvious

workgroup = workgroup

server string = opensolaris

wins support = yes – lets your server act as a WINS box


[share] – share name

path = /raidz1/share – share path

available = yes – enabled?

browseable = yes

public = yes

valid users = user1, user2 – only these users can access the share

writable = yes – equivalent to read / write in windows share properties

read only = yes – sets the default permissions to read only

write list = user1, user2 – these users can write to the share. Overrides above “read only” setting.

There are some good examples within /etc/sfw/smb.conf-example. Look there for some tips.

You also have an option of managing samba via the web – SWAT (samba web admin t). To get this up an running enable the swat service svc:/network/swat:default then browse to http://server:901

Optimizing SMB

I’ve found that adding this to /etc/sfw/smb.conf helps throughput in some cases. Try for yourself;  (it tends to put a higher load on cpu)

[global]

aio read size = 1
aio write size = 1

Further to this entry i have discovered that the built in CIFS / SMB service is much more efficient since it is included as part of the kernel. See my other posts on setting up cifs

Updated : 9/08/2009

I’ve swapped back to samba due to the issues i’ve had with cifs in the later releases. Remember if you wish to swap back to samba yo uneed to remove the sharesmb properties from each of your zfs shares – else on reboot zfs will re-enable the server/smb service.

There are some additional settings to ensure that your file server is the master browser for your workgroup. Put these under your [global]

[global]
domain master = Yes
local master = Yes
preferred master = Yes
os level = 35

Apparently on windows the os level reaches only 32 – so setting this to 35 ensures that your file server remains the master browser when an election is performed.

Opensolaris : Citrix XenServer / ESX – Hooking into ZFS

To share your zfs pool via NFS (that works with Citrix Xen / ESX) to a host called “esxhost”;

zfs set sharenfs=rw,nosuid,root=esxhost tank/nfs

Note : You MUST have a resolvable name from the opensolaris box. i.e. you should be able to ping it. I have tried with ip’s only and it will fail. I have edited the /etc/hosts file to include the following line for my config;

# Copyright 2007 Sun Microsystems, Inc. All rights reserved.
# Use is subject to license terms.
#
# ident “%Z%%M% %I% %E% SMI”
#
# Internet host table
#
192.168.9.120 esxhost

This also requires that you are using both DNS and Files in your /etc/nsswitch.conf file. You should have a line like so;

# You must also set up the /etc/resolv.conf file for DNS name
# server lookup. See resolv.conf(4). For lookup via mdns
# svc:/network/dns/multicast:default must also be enabled. See mdnsd(1M)
hosts: files dns mdns

# Note that IPv4 addresses are searched for in all of the ipnodes databases
# before searching the hosts databases.
ipnodes: files dns mdns

i’ve also run this before hand; (to allow full access)

chmod -R 777 /tank/nfs

Update : check this guide http://blog.laspina.ca/ubiquitous/running-zfs-over-nfs-as-a-vmware-store

Update 2: there are known issues with waiting for sync when using both NFS and ZFS together…. There are reasons why you shouldnt do this, but in a test enviornemnt disabling sync at ZFS level may help performance (zfs set sync=disabled)

I like this idea of spliting up your SSD too… again in test enviornment no problems, in production i would utilize the entire drive to the tasks https://blogs.oracle.com/ds/entry/make_the_most_of_your

opensolaris / zfs – whitebox build

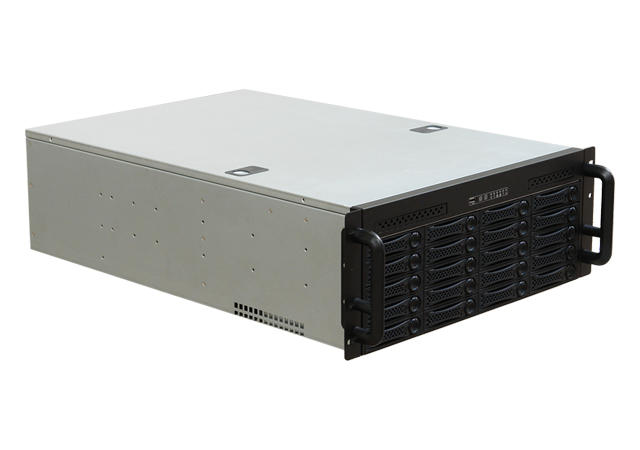
I’ve built a little server for home use, but it pales in comparison to this beast… This type of setup would be perfect for a lab / test environment that requires lots of fast and reliable disk. SCSI drives are fading out, SATA can perform if its setup right. When you look at the price of the entire build you wonder why corporations continue to spend the big bucks on the big storage names.

Check out this build (very nice clear guide)   http://www.stringliterals.com/?p=77

rpc-4020b (1)

Awesome piece of work.

zfs – playing with various configs

If you dont have the disks available to build up a zpool and have a play with zfs you can actually just use files created with the mkfile command… The commands are exactly the same.

mkfile 64m disk1

mkfile 64m disk2

mkfile 64m disk3

mkfile 10m disk4

mkfile 100m disk5

mkfile 100m disk6

Now you can create a zpool using the above files… (i’m using raidz for this setup)

zpool create test raidz /fullpath/disk1 /fullpath/disk2 /fullpath/disk3

if you now want to expand this pool using another three drives (files) you can run this command

zpool add test raidz /fullpath/disk4 /fullpath/disk5 /fullpath/disk6

Check the status of the zpool

zpool status test

NAME STATE READ WRITE CKSUM

test ONLINE 0 0 0
raidz1 ONLINE 0 0 0
/export/home/daz/disk1 ONLINE 0 0 0
/export/home/daz/disk2 ONLINE 0 0 0
/export/home/daz/disk3 ONLINE 0 0 0
raidz1 ONLINE 0 0 0
/export/home/daz/disk4 ONLINE 0 0 0
/export/home/daz/disk5 ONLINE 0 0 0
/export/home/daz/disk6 ONLINE 0 0 0

errors: No known data errors


Now time to replace a drive (perhaps you wish to slowly increase your space) Note: all drives in that particular raidz pool need to be replaced with larger drives before the additional space is shown.

mkfile 200m disk7

mkfile 200m disk8

mkfile 200m disk9

Check the size of the zpool first;

zpool list test

NAME SIZE USED AVAIL CAP HEALTH ALTROOT
test 464M 349M 115M 75% ONLINE –

Now replace all of the smaller drives with the larger ones…

zpool replace test /export/home/daz/disk1 /export/home/daz/disk7
zpool replace test /export/home/daz/disk2 /export/home/daz/disk8
zpool replace test /export/home/daz/disk3 /export/home/daz/disk9

The space will show up if you bounce the box, i’ve heard that sometimes you may need to export and import but i’ve never had to do that.