Opensolaris – Updating solaris with the development repository

Want to keep your opensolaris on the “edge” of developments? Most of the experience i have had is that the “dev” repository contains mainly stable releases that are being held until the next official release (every 6 months).

This is how you do it…

Launch Package Manager – and choose “settings” then “manage repositories”

Add the dev repository URL and give it a name.

NOTE: The name cannot contain any spaces!

Name : dev.opensolaris.org
URL : http://pkg.opensolaris.org/dev

If you make it the preferred repository Update manager will inform you of the new updates that are available.

Update : i have had a lockup with the cifs service as well as a problem with the keyboard working in VNC (if it wasnt plugged in at boot). So i have decided to revert back to the non-development repository. See this post on how to use beadm

Router on a stick – Adding VLANs to a cisco router

Telnet to your cisco router, enable then go into config t. Passwords may be required depending on how it has been configured…

en

config t

Ensure that ip routing has been enabled…

ip routing

To create the VLAN adapter you’ll need to run the following commands to create a “router on a stick”…   Note: the .2 after the interface name creates a virtual adapter on the interface.

interface FastEthernet1/1.2
description “VM Host Network”
encapsulation dot1Q 2
ip address 172.25.2.1 255.255.255.0

The following is another example of a VLAN (110) on a router. This one has the ip helper-address (DHCP server) specified for this range.

interface FastEthernet1/1.110
description “Ak IDN”
encapsulation dot1Q 110
ip address 172.25.20.1 255.255.255.0
ip helper-address 172.25.20.15

That is the router side of things setup. Remember to save your changes via…

copy run start

Now you’ll need to add the VLAN to your switches. If you have VTP in your environment its as simple as adding the extra vlan onto your “server” vtp switch. Telnet (or null cable) to your “server” switch and go into “enable” mode, then go into the vlan database and add the required vlans as per above…

en

vlan database

vlan 2 name “VM Host Network”

vlan 110 name “Ak IDN”

VTP will propagate the vlans out to your client switches. Done.

Diskpart – resizing virtual machine system volumes (windows)

Diskpart works quite well extending disk sizes – …unless its the system disk that you need to extend.

Luckily in the virtual world its somewhat easier to move your disks about. This is a quick list of the steps required to increase your system disk… 

You will need to have another virtual machine available to boot into (windows 2003 etc) 

  1. Shut down the virtual machine with the system disk you wish to extend
  2. Go into virtual machine settings and increase the system drive size to what you require
  3. Now you need your spare w2k3 virtual machine or similar. While it is in a shutdown state add the system disk you wish to extend into this machine as another hard disk. Note: select “existing harddrive” and not the default option of  “new harddrive”, and point to the system drive you wish to extend (It is possible to attach this disk as long it is not on and being used) 
  4. Power up the spare machine with the newly attached hard drive (the drive you wish to extend) 
  5. Logon, open up cmd prompt and type “diskpart” 
  6. Now you need to find and select your disk. Type “list disk” to see available disk numbers (most likely the last drive letter). Then type “select disk #”   (# = the number you got from the list command)
  7. Next select the volume, similar to above type “list volume” then “select volume #
  8. Type “extend”
  9. Type “exit” 
  10. Done – shutdown the machine and disconnect the drive you just extended. Be carefull not to DELETE the drive, you only want to disconnect it. 
  11. Now you should be able to fire up the original machine and it will have a larger system drive. 

There are obviously other 3rd party utilities to do this but this is handy to know and is actually quite fast.

zfs – java management gui

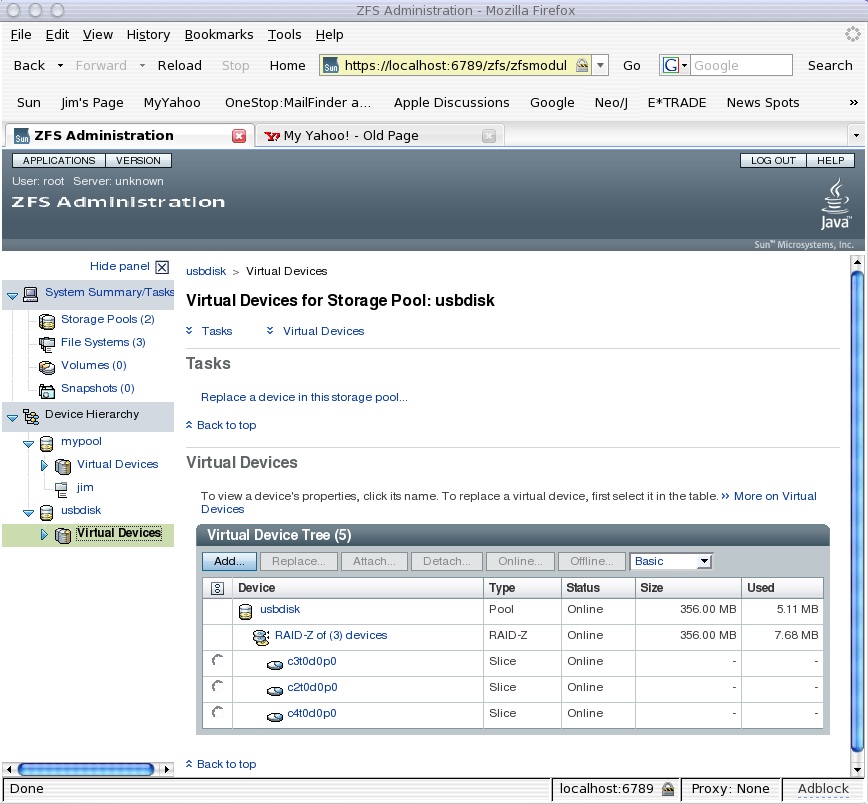
It hasn’t made it into opensolaris yet. But from what i’ve heard it should be making an appearance over from the solaris 10 OS soon. Here is a screenshot of what it looks like…

zfsscreenshot

Should make managing zfs a bit easier – though its already quite easy.  Perhaps if you have quite alot of zpools / zfs file systems it will look prettier.   ;)

Troubleshooting – Time Slider (zfs snapshots)

1. snapshot complains about no access to cron

This problem i came across was after i was playing with crontab. It looks like the zfs snapshot service uses an account called “zfssnap” and if it doesnt have access to cron then it will have issues creating / checking snapshots. Check the file /etc/cron.d/cron.allow and ensure that “zfssnap” is in there. The issues i had looked like this in the log…   (check the logs via the log file viewer)

Checking for non-recursive missed // snapshots  rpool

Checking for recursive missed // snapshots protected rpool/backup rpool/export rpool/ROOT unprotected

crontab: you are not authorized to use cron.  Sorry.

crontab: you are not authorized to use cron.  Sorry.

Error: Unable to add cron job!

Moving service to maintenance mode.

The actual crontab lives in the /var/spool/cron/crontab/zfssnap file. (don’t edit this manually)

Restart the services by clearing the maintenance status then if required enable or restart like so…

svcadm clear auto-snapshot:frequent

svcadm enable auto-snapshot:frequent

Check that all zfs snapshot services are running as expected….

svcs -a | grep snapshot

online         22:26:12 svc:/system/filesystem/zfs/auto-snapshot:weekly

online          9:06:36 svc:/system/filesystem/zfs/auto-snapshot:monthly

online          9:11:23 svc:/system/filesystem/zfs/auto-snapshot:daily

online          9:12:00 svc:/system/filesystem/zfs/auto-snapshot:hourly

online          9:23:57 svc:/system/filesystem/zfs/auto-snapshot:frequent

2. snapshot fails with dataset busy error

Seen something similar to this in the logs? …

Checking for recursive missed // snapshots protected rpool/backup rpool/export rpool/ROOT unprotected

Last snapshot for svc:/system/filesystem/zfs/auto-snapshot:frequent taken on Sun Mar 15 22:26 2009

which was greater than the 15 minutes schedule. Taking snapshot now.

cannot create snapshot 'rpool/ROOT/opensolaris@zfs-auto-snap:frequent-2009-03-16-09:06': dataset is busy

no snapshots were created

Error: Unable to take recursive snapshots of rpool/ROOT@zfs-auto-snap:frequent-2009-03-16-09:06.

Moving service svc:/system/filesystem/zfs/auto-snapshot:frequent to maintenance mode.

Here is an bit from this site – “This problem is being caused by the old (IE: read non-active) boot environments not being mounted and it is trying to snapshot them. You can’t ‘svcadm clear’ or ‘svcadm enable’ them because they will still fail.”

Apparently a bug with the zfs snapshots similar to /root/opensolaris type pools — anyhow to fix i’ve just used a custom setup in time slider. Clear all the services set to “maintenance” then launch time-slider-setup and configure to exclude the problem pools.

Update : As per Johns comments below you can disable the snapshots on the offending zfs system using the following command…

zfs set com.sun:auto-snapshot=false rpool/ROOT

As above to clear “maintenance” status on the effected services run the following command…

svcadm clear auto-snapshot:hourly

svcadm clear auto-snapshot:frequent

Now run this to ensure all the SMF services are running without issue…

svcs -x

If all is well you will get no output.