Solar – modifications complete

Two recent modifications to my solar system have changed the daily generated power considerably.

First section highlighted above – i added the ATS and 24/7 load (this server)

Second section highlighted above – moving the 6 panels from east and west to north facing roof. (only reason i didn’t do this initially is north facing roof is a lot higher and i hate heights!)

Copper wire gauge and max amps

Do not skimp on your wiring across your solar installation. Pushing too many amps across a wire that is too small can cause fires and short your installation – this is dangerous!

A rightly sized wire reduces resistance and can assist with reducing voltage drop.

For example, in my system i have a 1000W inverter attached to my 24v battery. If i’m pulling 1000W, then amps 1000W / 24V = 41.67A. Meaning i should be using a 6 gauge wire (see below) between my battery and inverter.

Solar panels can be attached in series to increase their voltage, this is one method for reducing amps over the wire. But, keep in mind that if you raise the voltage you will need a way to reduce it back down to match the voltage of your battery. i.e. in most cases it would be best to utilize a MPPT solar controller to automatically convert the power from your solar panels to you battery.

As a GUIDE to maximum amps across a copper wire ;

  • 14-gauge wire: 15 amps
  • 12-gauge wire: 20 amps
  • 10-gauge wire: 30 amps
  • 8-gauge wire: 40 amps
  • 6-gauge wire: 55 amps
  • 4-gauge wire: 70 amps
  • 3-gauge wire: 85 amps
  • 2-gauge wire: 95 amps

Note : length of wire also determines its resistance. I have not covered it here, but if running wires over large distances you will also require a lower (fatter) gauge wire. Try to keep high amp loads across short distances. i.e. keep your inverter near your batteries.

lead acid battery “state of charge” chart

Lead acid batteries do not like being completely discharged. I have used the following chart for reference, in most cases i only discharge my battery to 50% DOD (depth of discharge).

Even deep cycle lead acids life (max charge cycles) will be extended if it is not completely discharged. It is also generally recommend to completely charge your battery after use – i.e. take the battery back to full charge in a single cycle.

My battery is a deep cycle 24v bank, so i generally only discharge (under load) to about 24.0v (see ATS post)

ATS – 24/7 power loads on solar!

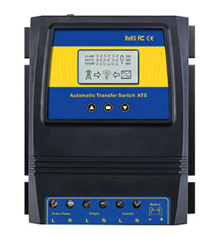
By hooking up my ATS in my solar system, I’m nearing the end of my solar experiment. I cannot recommend the ATS (automatic transfer system) more, such a brillient device.

By installing the ATS i am keeping my solar power generated off grid, but with on grid backup for any loads i attach to it. Also keeps me away from any danger introduced by back filling the grid

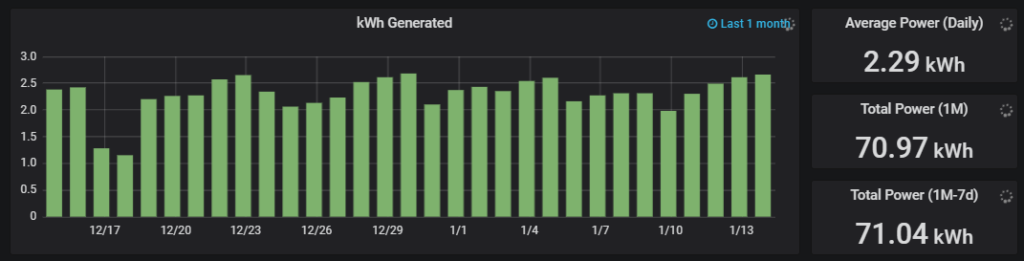
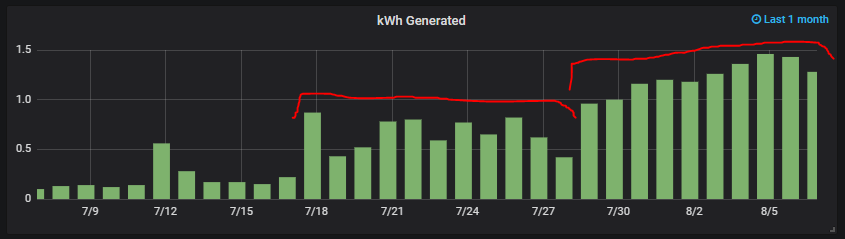
So i can run a 24/7 load which will automatically flick over to main power when the batteries are low. At the moment i am powering my attached server (the load) approx 33% of the day. I could power my server for longer if i had a larger battery attached to solar. Its currently winter, so sunlight hours are also limited.

Check out this video for more – https://www.youtube.com/watch?v=ni0A_ZdH7aU.

ATS on Ali Express – https://bit.ly/2O63Hq4

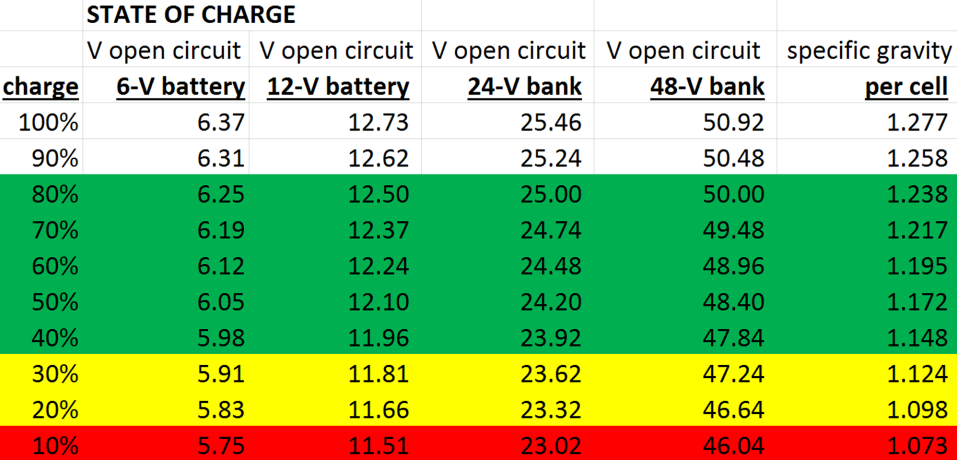
I’m running a 24v lead acid (yuck) battery. I have setup the LV (low voltage) cut over to 24.0V. Keep in mind that under load there is a voltage drop so when the ATS flicks back to mains the battery actually jumps back to about 24.5V (over 50% DOD).

My HV (high voltage) is set to 29.0V, this is voltage when not under load. Again lead acid batteries like to be fully charged, so i have to take this quite high to ensure longer life of my battery.

Note : Running UNRAID server also helps, each disk while not being used will power down reducing my power draw. The unique RAID also means that all disks do not need to spin up on data access (non distributed parity). Friken cool!

Disclaimer : This dabbles with high voltage, please do NOT attempt install without certified assistance. Electricity is dangerous!