Cloudflare are nice enough to provide a free tier to their CDN service which is perfect for those of us that still host websites at home. The free teir provides some basic benefits – DDOS protection and caching. Check out the details here – https://www.cloudflare.com/plans/#overview
If you utilize their tunneling solution, you’ll also be able to host websites behind a dynamic IP. You’ll no longer need a static IP. This means the traffic goes like so;
Your website <-> ACME <-> Cloudflare tunnel <-> Cloudflare <-> User
Double cool! Check out these resources to do it for yourself –
Since my first attempt at solar, I have learnt a few things and several new bits of tech have been introduced into the market. Some of the new tech include; all-in-one inverters, bigger “better” batteries, shingled solar panels and micro-inverters…
Time to take the learnings from my first solar project and scale-out
New Parts
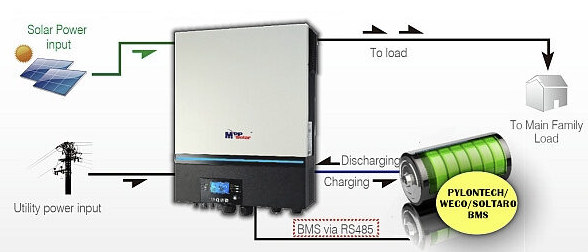
An all-in-one solar inverters can include the following functions in a single device;
Solar Controller – MPPT (2x string inputs)
Inverter – Converts DC (48v) to AC (pure sine wave @230v, 50 hertz)
Battery Charger –
from Grid (AC -> DC)
from Solar Panels (DC -> DC)
ATS / Line mode – Flicks over to Grid if solar or batteries are low
BMS, Timers and Controls – Can program battery types, priorities and timers depending on how you want to power your loads and utilize your batteries.
Stats / Alerts – WIFI enabled
I have committed to an 8kW PV all-in-one inverter. My house doesn’t have a north-facing roof, but it has a NE and NW facing roof which isn’t too bad, the bonus of having 2 string feeds on the inverter means that each side of the roof will act independently without dragging down the total power output.
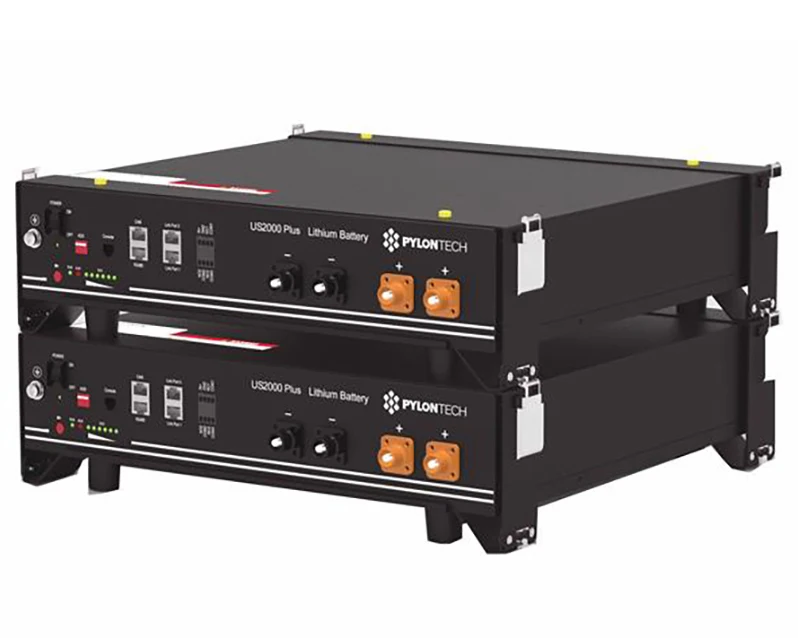
I’m currently running a few lead-acid batteries on my solar. I’ve been in two minds about whether I continue with batteries or go with a hybrid system that effectively uses the grid as a battery. I ended up deciding to go with batteries one last time, here in NZ the solar rebate is not really worth the effort of exporting – we typically get wholesale prices which can be 1/3 of the cost of power. I’ve also been pretty excited about how quickly the new LiFePO batteries can charge and discharge, so I’ve committed to a couple of 48v PylonTech batteries in a stack, totaling 7kWh.
They can peak at 100A (15s) but the recommended rate is 37A each. At 48v this will give me a charge / discharge power rate of 3.55kW (37A x 48V x2) in total. In some cases it may be beneficial to charge with cheaper off-peak power from the grid.
Singled solar panels are pretty nice, with more surface area and better resiliency. I found a 480W mono Hyundai panel which I’ll use to build 2 strings of 4 panels. In total, this gives me 3.84kW (480W x 4 x 2)
In terms of power, for my next venture I decided to stay with the more traditional DC solar panels. There is however another choice thanks to the introduction of micro-inverters. These little devices convert power on each panel direct to AC, which includes several advantages; higher voltage, operate in parallel (independent of other panels). Each also has its own sensors if you want to see stats!
The next sections – powering things, ROI, the build, safety
The above commands tell git to run initial setup, add current folder as content then add associated remote gitlab repository.
Note the format to use while using a user token. The user token is issued by GitLab, your username will also be there. You will need to ensure that your token has both read and write access to the repository.
Sometimes you need something that can kick a host a bit harder than the standard reboot command. Even if you include the -f switch to force, a hung task can prevent your host from rebooting.
Try this – first enable the sysrq setting, then trigger. Your host should reboot immediately.
sudo echo 1 > /proc/sys/kernel/sysrq sudo echo b > /proc/sysrq-trigger
Note : This is effectively a hard reset which does not cleanly shut services or tasks down. You may need to check your disk on some operating systems.
Do you have a large collection of video media files not using HEVC (H265) yet? There is a massive amount of disk space coming your way if you flick over to the new video codec format.
HEVC definitely lives up to its name, for most media you can expect a 70% or more disk savings from transcoding from an old codec. There are some catches though… If you want your TV to play it direct (i.e. straight off the file) the codec will need to be supported by it. You can of course get around this by using a media server such as Plex or Emby which will transcode from HEVC back to a compatible format.
Why would you transcode to HEVC? – again, disk space. HEVC as stated above can reduced you Media footprint significantly. You could boost your quality and save your disk space at the same time by recording at a higher resolution then applying the HEVC codec.
I created a powershell script to transcode my media to HEVC using my AMD graphics card. The advantage of doing this is that transcoding completed by my GPU is significantly faster than my CPU. I do not have the graphics card in my media server, so instead connect via SMB and let my gaming machine run the transcoding from remote…
The powershell script uses ffmpeg to ;
transcodes video stream to hevc using AMD h/w encoder
copys all existing audio and subtitles (i.e. no conversion)
works in batches (to prevent constant scanning of files) – able to set max batch size and processing time before re-scanning disk
overwrites source with new HEVC transcode if move_file = 1 (WARNING this is default!)
checks to see if video codec is already HEVC (if so, skips)
writes transcode.log for successful transcode (duration and space savings)
writes skip.log for already hevc and failed transcodes (used to skip in next loop, errors in transcode.log)